The Story & Intro
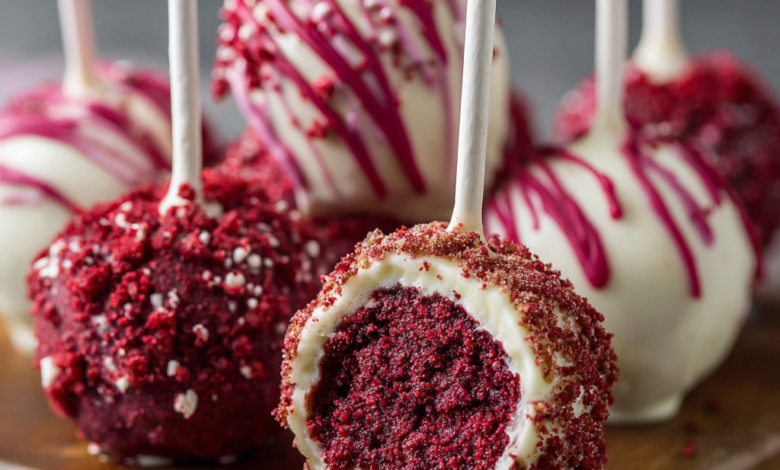
If you’ve been craving something sweet, charming, and just a little fancy, these Cream Cheese Red Velvet Truffle Pops are about to become your new dessert obsession. I still remember the first time I made the it was one of those chilly afternoons when the oven warmed up the whole house, and the smell of cocoa and vanilla wrapped itself around me like a soft red velvet scarf.
As I rolled the warm cake into little balls, dipping my fingers in cream cheese frosting, I couldn’t help but laugh at how messy everything was getting. But honestly? That’s half the joy of making Cream Cheese Red Velvet Truffle Pops they’re playful, hands-on, and absolutely irresistible.
And as always, Bonjour my friends! 👋
I’m Lacamorea, a 31-year-old French girl who traded the cobblestone streets of Paris for the cozy kitchens of America 🇫🇷➡️🇺🇸. Ever since I could reach the countertop, I’ve been whisking, stirring, and sneaking tastes of cake batter when no one was looking 🍰😋. Cooking isn’t just my passion it’s my love language, my therapy, and my favorite way to make people smile.
So today, with that same childlike sweetness and cozy kitchen warmth, I’m sharing my twist on Cream Cheese Red Velvet Truffle Pops a treat that’s soft, creamy, elegant, and perfect for holidays, parties, gifting, or late-night cravings when you want just one more bite.
We’re about to roll, dip, swirl, and sprinkle our way into dessert heaven. And trust me you’re going to adore these dreamy red velvet bites.
⏱️ Time
- Prep: 25 minutes
- Chill: 30 minutes
- Decorating: 20 minutes
- Total: ~1 hour 15 minutes
🛒 Ingredients

4
For the Red Velvet Base
- 1 baked red velvet cake (store-bought or homemade)
- 1 cup cream cheese frosting
- 1 teaspoon vanilla extract
- Pinch of salt
For the Coating
- 2 cups white chocolate melting wafers
- 1 cup dark or milk chocolate melting wafers (optional)
- 2 tablespoons coconut oil (helps chocolate stay smooth)
For Decoration
- Red sprinkles
- White chocolate drizzle
- Mini heart sprinkles
- Lollipop sticks (optional if you want them as pops)
👩🍳 Instructions


1. Crumble the Cake
Take your cooled red velvet cake and crumble it into a large bowl. You want fine crumbs—no big chunks. The finer the crumble, the creamier your Cream Cheese Red Velvet Truffle Pops will be.
2. Add the Cream Cheese Frosting
Add the frosting, vanilla, and salt. Start with half the frosting and gradually add more until the mixture becomes sticky enough to hold shape. It should feel like soft cookie dough smooth but firm.
3. Shape the Truffles
Scoop 1-tablespoon portions and roll them into balls. Place onto a parchment-lined tray.
If making pops, dip the end of each stick in melted chocolate and insert it halfway into each ball—this secures it.
4. Chill
Refrigerate for 30 minutes, or freeze for 10–12 minutes. Cold truffles coat better and hold their shape.
5. Melt the Chocolate
In separate bowls, melt your white and dark chocolate with a little coconut oil. Microwave in 20–30 second bursts, stirring until silky.
6. Dip & Tap
Dip each chilled truffle into the melted chocolate. Gently tap off excess, rotating for a smooth finish.
7. Decorate
Add sprinkles, crushed red velvet crumbs, or drizzle with contrasting chocolate while still wet.
8. Dry & Set
Place them upright in a styrofoam block (for pops) or onto parchment (for truffle balls). Allow 10–15 minutes for chocolate to firm.
And voilà your Cream Cheese Red Velvet Truffle Pops are ready to steal hearts. 💕
Serving Suggestions
- Serve on a dessert platter with strawberries for a romantic touch.
- Wrap individually for edible gifts.
- Add to a holiday treat box these red beauties shine!
- Display pops in a mason jar filled with sugar for a cute DIY stand.
- Pair with coffee or hot cocoa for the coziest combination.
Recipe Card
⭐ Cream Cheese Red Velvet Truffle Pops
⏱️ Time: 1 hour 15 minutes
🍽️ Servings: 24 truffle pops
🛒 Ingredients
- 1 baked red velvet cake
- 1 cup cream cheese frosting
- 1 tsp vanilla extract
- Pinch of salt
- 2 cups white chocolate melting wafers
- 1 cup dark chocolate melting wafers
- 2 tbsp coconut oil
- Sprinkles for decoration
- Lollipop sticks (optional)
👩🍳 Instructions
- Crumble the cake into fine crumbs.
- Mix with frosting, vanilla, and salt until dough-like.
- Roll into 1-tbsp balls. Add sticks if making pops.
- Chill for 30 minutes.
- Melt chocolates with coconut oil.
- Dip chilled truffles and decorate.
- Let set and enjoy!
📝 Notes
- If the mixture is too sticky, chill before rolling.
- Too dry? Add 1 tablespoon additional frosting.
- For vibrant color, drizzle with red candy melts.
- Store in the fridge up to 5 days or freeze up to 2 months.
🍽️ Nutrition
(Per truffle pop, approx.)
- Calories: 140
- Fat: 8g
- Carbs: 15g
- Protein: 1g
- Sugar: 12g
Conclusion
There’s something magical about making Cream Cheese Red Velvet Truffle Pops that moment when the chocolate shell cracks, revealing a creamy, velvety center that melts on your tongue. These treats feel elegant yet playful, nostalgic yet modern. Whether you’re gifting them or enjoying them one by one with a cup of tea, they’re guaranteed to spark joy.
From my cozy kitchen to yours, I hope these little red velvet gems bring sweetness, laughter, and warmth into your home. ❤️